
Exchange 2010 – Part 18 – Understanding and Managing Outlook Anywhere and POP/IMAP
In this post, we’ll look at two main parts to Outlook Anywhere and the POP/IMAP protocols:
- We will explain the concepts of Outlook Anywhere, POP, and IMAP.
- We will look at the implementation of Outlook Anywhere, POP and IMAP.
Outlook Anywhere, POP and IMAP are different from Outlook Web App and ActiveSync. You can get OWA and ActiveSync to work with an Exchange self-signed certificate. Although for a production environment, it’s best to setup your own cert server or purchase a certificate from a Third-Party Certificate Authority. But with Outlook Anywhere, POP/IMAP, to go live, you need valid certificates. If you’re tempted to setup a PKI infrastructure, it’s not as easy as you might think. It usually isn’t worth the headache when you can purchase certs from CA’s for a very low cost.
Outlook Anywhere Overview
- Outlook Anywhere allows external clients to use Outlook 2003/2007/2010 to connect directly to their corporate network email, without using a VPN connection.
- Outlook Anywhere uses a networking feature called RPC over HTTP (in fact, in legacy Exchange versions that was the name of Outlook Anywhere). RPC over HTTP is a component in Windows – where Outlook Anywhere takes client connections using Remote Procedure Calls, boxes it up in HTTP and passes it through the firewall.
- All you have to do is enable Outlook Anywhere on a CAS server
- *Install a valid SSL certificate – because certs touches on many areas which we will cover in a later post.
- *Install the RPC over HTTP component – this component is probably installed already during an initial installation. If we still need to install, you go to Server Manager -> Features -> Add Feature
- *Enable Outlook Anywhere.
- You can enable Outlook Anywhere from EMC or EMS
- *”Enable-OutlookAnywhere” cmdlet.
- To test Outlook Anywhere you can use the following tools:
- *Run the Test-OutlookConnectivity cmdlet to ensure your RPC over HTTP connections and TCP/IP settings are right.
- *Run the Exchange Remote Connectivity Analyzer (ExRCA) tool.
- Testing looks for the following:
- Autodiscover connectivity
- DNS validation
- Certificate Validation
- Firewall configuration
- Client connectivity
POP and IMAP Overview
- Protocols for connecting to Exchange (disabled by default) most organizations would prefer you do not use POP as a security liability.
- The old standard: POP was designed for ‘offline mail processing’
- * POP removes emails from the server and brings them down to a local client (unless configured otherwise)
- * POP doesn’t provide calendaring, contacts, or tasks
- The new standard: IMAP
- * Provides both online and offline access but still no extra features like calendaring, contacts, or tasks
- Note: These are ‘receive protocols’ not ‘send protocols’ so they still rely on SMTP to send email
- With both POP and IMAP, the client is responsible for checking in for mail, it isn’t pushed down to the client.
- Enabling POP and IMAP is as easy as enabling the services on the system
- After the services are running you can enable your users to use POP or IMAP
- You can configure various properties for each protocol including:
- * Connection Limits
- * Security
- * Message Retrieval format options
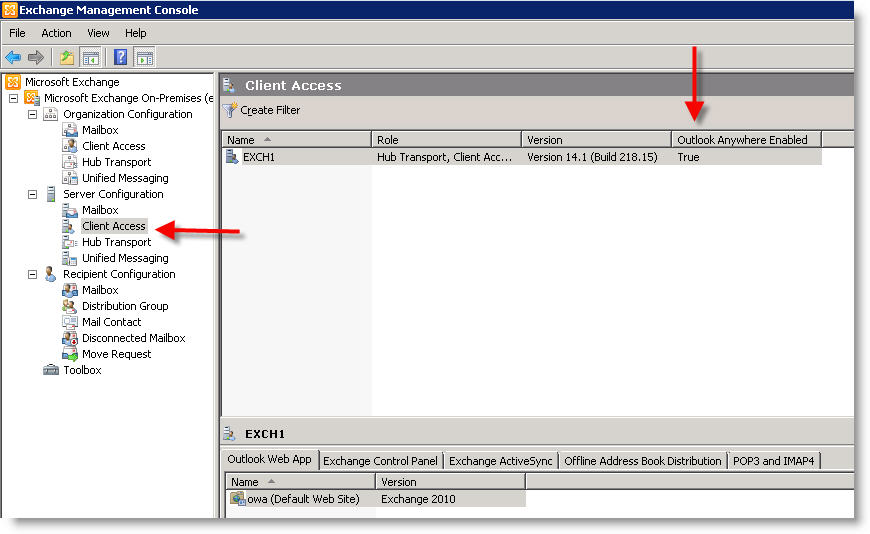
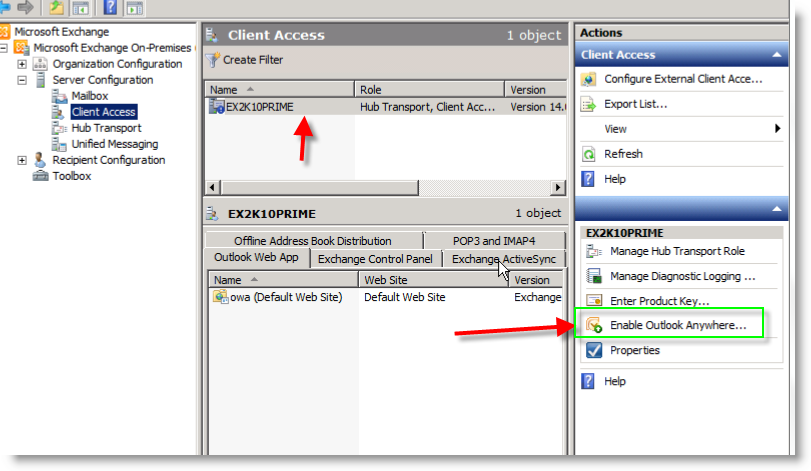
To enable Outlook Anywhere, open the EMC and browse to Server Configuration and then the Client Access Role:


From here you will be directed to a simple Wizard. Here you will enter the External Host Name:
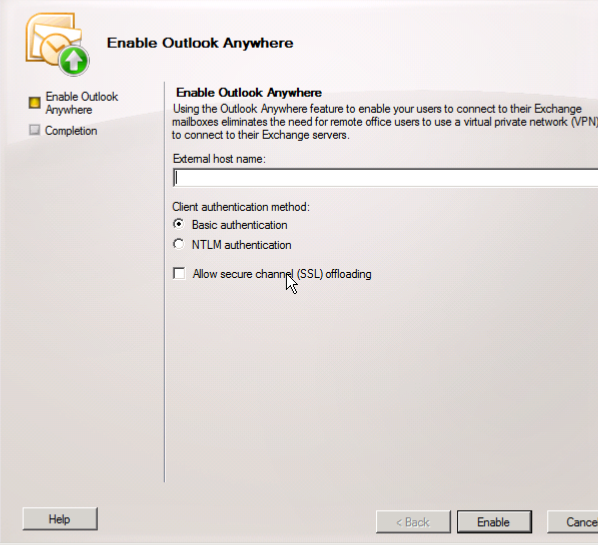

Here we will want to provide an External Host Name that an external client will use to connect to the server, something like site.jasoncoltrin.com or mail.jasoncoltrin.com.
Client Authentication method:
Basic Authentication – A client will need to provide a domain/username/password and will need to be entered every time when connecting to the server. When Basic Authentication is used, the information will be sent in clear-text over the wire.
NTLM Authentication – The user doesn’t have to enter a Username/Password, the windows network authentication is used and is encrypted and a hash is passed through the networks. NTLM Authentication can cause problems when trying to pass the encrypted traffic through firewalls, and some Exchange Admins will want to use Basic authentication if users are not members of the Exchange Server’s domain. Clients that have already logged into a domain, are simply passing cached credentials to Exchange.
Allow Secure Channel (SSL) offloading – This is all about if you have a separate server for SSL encryption/decryption. Some choose to use a SSL accelerator to offload the CPU processing power used for SLL.
First, make sure that under the Server Manager -> Features -> make sure the RPC over HTTP Proxy feature is Installed/Added.
The command for enabling Outlook Anywhere with the Exchange Management Shell will something like the following:
enable-OutlookAnywhere -Server ‘EXCH1’ -ExternalHostname ‘mail.jasoncoltrin.com’ -DefaultAuthenticationMethod ‘Basic’ -SSLOffloading $false
To configure POP3 and IMAP4, we do not enable/configure it through the Exchange Console, we will actually go into the server’s services:
Start -> Administrative Tools -> Services (control panel)
Find the service named Microsoft Exchange POP3 ->Startup = Automatic -> Startuptype: Automatic (then start the service)
Find the service named Microsoft Exchange IMAP4 ->Startup = Automatic -> Startuptype: Automatic (then start the service)
To make changes to the protocols, you can change them in the EMC -> Client Access -> POP3 and IMAP4 tab.
To Configure the Clients i.e., to decide which recipients are allowed access to Outlook Anywhere/POP3/IMAP4, go into EMC ->Recipients ->Right-click on users -Properties ->Mailbox Features Tab -> Enable/disable POP3/IMAP4
Using the Set-CASMailbox cmdlet
In order to control the access to some of our client access server settings, we want to use the Set-CASMailbox cmdlet.
- The Set-CASMailbox cmdlet is used to set attributes related to client access for ActiveSync, OWA, Outlook Anywhere, POP and IMAP for specified users.
- You can use the command with the -MAPIBlockOutlookRpcHttp parameter to determine if clients can connect to Outlook using Outlook Anywhere. For example, if you want make sure users in a certain location deny them the ability to use Outlook Anywhere.
- * Get-Mailbox “UserHere” | Set-Casmailbox -mapiblockoutlookrpchttp:$true
- * Get-Mailbox -OrganizationalUnit “OU here” | Set-Casmailbox -mapiblockoutlookrpchttp:$true (anyone who has this applied will not be allowed to use Outlook Anywhere).
- Or you can use ISA or some other solution to block entry (or other proxy filtering software)
In review, we learned the purpose of Outlook Anywhere, POP and IMAP. We reviewed the initial configuration of these different access methods. It’s not all that complicated to setup.
A couple of EMS points to remember:
*Enable-OutlookAnywhere (can enable through shell)
*Test-OutlookConnectivity (ensures connectivity is solid) – an excellent tutorial for using the Test-OutlookConnectivity cmdlet is located here: http://blogs.catapultsystems.com/tharrington/archive/2010/09/17/troubleshooting-the-client-access-server.aspx
*Set-CASMailbox (cmdlet configures users for access to the Client Access Server)
A large majority of the content provided in my Blog’s Exchange series is derived from J. Peter Bruzzese’ excellent Train Signals Exchange Server 2010 Video Disk Series, as well as my own Exchange 2010 lab. Trainsignal.com is an invaluable source for accurate, easy to understand, IT information and training. http://www.trainsignal.com


